

Claim your website to become a Hvr Sitepartner and have your latest content delivered to users across the app.
Your site is claimed by adding an HTML tag to your website’s source code. An HTML tag is a piece of text that describes a web page’s content. By adding an HTML tag to your website’s source code, Hvr will confirm that you own your website. Once claimed, the tag can be removed.
Before You Begin
Verify that you or your business own a second-level domain (example.com), a subdomain (ads.example.com) or a subpath domain (example.com/blog).
Please note, website hosts have different instructions for accessing their source codes. We have included full instructions here for WordPress and Squarespace with links to other popular website platforms below.
Adding an HTML Tag to Your Header in WordPress
If you want to add HTML to your WordPress header there are three possible solutions:
- Manually, by editing your theme’s header.php and footer.php files
- With your theme’s built-in header and footer code feature
- Using a plugin
The first option requires you to add header code by directly editing the header.php files manually. If you know your way around WordPress, this can be a quick option to add header code to your website. Please note, using this method, your code will be removed if you update your theme.
This video will show you how to edit the header.php file.
Some WordPress themes offer a built-in option for quickly adding code and scripts to your WordPress header. These settings can be found within your Theme Options >> Header settings. If you change your theme, all code snippets added to your website will be removed.
This third option is by far the easiest and safest method to add header or footer code in WordPress.
The ‘Insert Headers and Footers’ plugin is 100% free, 5-star rated, and allows users to easily add code to the header or footer in WordPress.

Benefits to using The Headers & Footers plugin:
- Easy, Fast, and Organized: It lets you easily add code to your site’s header.
- Prevents Errors: This plugin helps prevent errors which may occur if you edit your theme files manually.
- If you upgrade or change your theme, the plugin will save your header and footer code so you don’t have to worry about the code being removed.
The first thing you need to do is install and activate the Insert Headers and Footers plugin. For more details on installing a WordPress plugin, visit this link for easy beginner instructions.
Once the plugin is activated, go to Settings » Insert Headers and Footers from your admin panel. You will see two boxes for adding code to the header or footer.
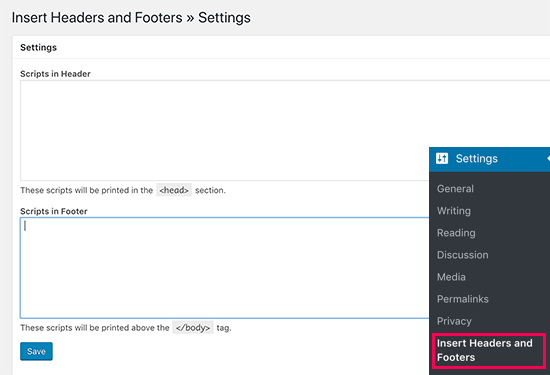
Paste the code in the ‘Scripts for Header’ box and hit save. Voila! The plugin will automatically load the code in the respective locations on your WordPress site. You can always edit and remove any code that you don’t want to keep. We recommend clearing your WordPress cache after saving the changes, to ensure the code properly shows up on the front-end of your website.
- You’ll need to keep the plugin installed and activated at all times. Deactivating the plugin will remove all custom code to your site.
You can now return to the Hvr app and tap ‘I’ve inputted the code’ to submit your Sitepartner Application.
Squarespace
- In the Home menu, click Settings, click Advanced, then click Code Injection.
- Add valid HTML or scripts into the appropriate Code Injection fields for the header, footer, lock page, or order confirmation page.
- After adding your code, click Save.
- Return to the Hvr app, tap ‘I’ve imputted the code’ in Sitepartner signup to submit your applicaiton.
This video will walk you through adding code to your header in Squarespace.
Instructions for Blogger, Big Cartel and Wix can be found at the links below:
If you have any questions or need a hand with adding code to the header on your site, please let us know! We’d be happy to help. 🤓